Technical Overview: Preventing DNS Leaks When Switching Network Interfaces


To effectively offer a user privacy and security, a VPN application must ensure that a user’s DNS requests remain private for the entire duration of the connection to the VPN. Applications usually do this by guaranteeing that all DNS requests are sent encrypted through the VPN tunnel and handled by the VPN provider’s DNS servers.
To maintain this guarantee, it is important to understand under what scenarios DNS leaks might occur. Considering only simple scenarios, such as when network connections are stable, is not sufficient. In the real world, networks are often unstable, or their configurations can change, and generally, this is when leaks occur. Investigating complex scenarios is thus a crucial part of the process of engineering a leak-proof VPN application.
At ExpressVPN, we spend considerable time and effort investigating complex scenarios under which your VPN application might leak. In the rest of this article, we discuss one particular scenario which we uncovered where DNS leaks could occur. We’ll explain how and why the DNS leak occurs and give you a way to test for the leaks yourself.
Scenario: DNS leaks after a switch in network interfaces
Switching between network interfaces is a common scenario where DNS leaks are possible. Consider the following example:
- You’re at home with your laptop and connected to Wi-Fi
- You connect with your VPN application
- Sometime later you plug in your Ethernet cable
Most VPN applications will not detect this network configuration change. They will continue to inform you that your privacy and security are still 100% protected, however, the reality can be very different.
Under the covers, your DNS requests can be persistently leaking out to your ISP or other third parties, and you may never realize it.
Technical Breakdown
When can this really happen?
Let’s take the example of a Mac (do note, though, that this leak also occurs with Windows devices). Suppose you have a Wi-Fi and Ethernet connection available. Open the “System Preferences” app and navigate to “Network.” You will see something like the following:
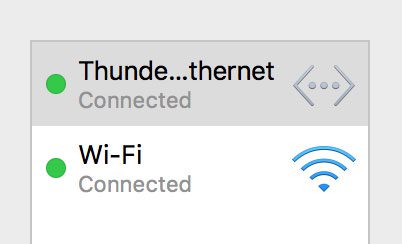
This indicates that you’re connected to both Wi-Fi and Ethernet, but Ethernet is your preferred connection.
Suppose further that your DNS is let to a “local” IP address. You can check this by clicking on “Advanced” when your Ethernet connection is highlighted and then navigating to “DNS.” You should see something like this:
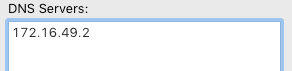
If the IP addresses under “DNS Servers” are of the form 10.x.x.x, 192.168.x.x or between 172.16.x.x and 172.31.x.x, then they’re “local” IP address. This most likely means that your router is acting as your DNS server and thus, without a VPN, your ISP can see all your DNS requests. If you have such a setup, then you may be vulnerable to this DNS leak.
Note that even if your DNS servers do not have local IP addresses, you will likely still be vulnerable to DNS leaks. In this case, the DNS requests may go through the VPN tunnel. However, they would not be routed to the VPN’s DNS server but to some other DNS server, such as that of your ISP or a third party DNS provider.
How can you check whether you leak?
The simplest method is to use a DNS leak tool and do the following:
- Ensure your Ethernet cable is unplugged
- Ensure you are connected to a Wi-Fi network
- Connect with your VPN application
- Use a DNS leak tool
- You should see only one DNS server listed
- Plug in your Ethernet cable
- Refresh the DNS leak page. If you’re leaking DNS, then you’ll now see a different list of DNS servers
You can also check for DNS leaks by using tcpdump as follows.
Firstly, find the network interface corresponding to your Ethernet connection:
-
- Open a Terminal window
- Type networksetup -listallhardwareports
- Look for a line like “Hardware Port: Thunderbolt Ethernet,” e.g.

- The network interface for your Ethernet connection is shown next to “Device.” In this example it’s en4
Now, let’s run the test:
-
- Ensure your Ethernet cable is unplugged
- Connect with your VPN application via Wi-Fi
- Plug in your Ethernet cable
- Open a Terminal window
- Type sudo tcpdump -i en4 port 53 and enter your password
- sudo gives tcpdump the necessary privileges to capture network traffic
- -i en4 tells tcpdump to listen on the Ethernet interface
- Replace en4 with the interface you discovered above
- port 53 is the port used for DNS traffic and thus shows you only DNS requests
- If you see any traffic, then you have DNS leaks, e.g.

What’s actually going on here?
The root cause of this leak is down to how the operating system determines which DNS servers to use. The DNS servers used by the system are always the ones associated to the highest priority active network service—this corresponds to the green service at the top of the list in the picture above.
With Ethernet disabled, the servers that will receive your DNS queries are those associated with the Wi-Fi service as it is now the highest priority active network service. The same is true when you connect to a VPN. To correctly send your DNS traffic to the VPN’s DNS server, most VPN providers change the DNS servers on the highest priority interface to their own DNS server. In this scenario, that means they change the DNS servers associated with your Wi-Fi network service.
When you plug in your Ethernet cable, the Ethernet network service jumps back to the top of the active list as it is now the highest priority network service. The operating system will then try to use the DNS servers associated with that service for any DNS lookups.
Many VPN applications won’t notice the problem because your Wi-Fi network is still up and running—it was never interrupted. However, while they may be sending your data encrypted over the Wi-Fi network, your DNS requests will be sent unencrypted to your ISP.
If your VPN application fails to protect against this scenario, then it will mean your DNS requests will leak out of the tunnel to your ISP.
Checking DNS nameservers in Terminal
As a side note, you can investigate the behavior of DNS servers yourself with the scutil command. To see what DNS servers the system is using simply:
-
-
- Open a Terminal window
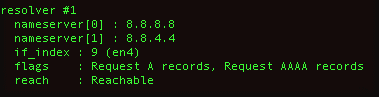
- Type scutil --dns
- At the top of the output, you should see “resolver #1” with a list of “nameserver”s, e.g.
-
-
-
- The IP addresses next to each “nameserver” indicate what the system will use for DNS requests
-
Interested in learning more? Have a question or comment?
Our engineering team would love to hear from you—simply drop us a line at editor@expressvpn.com.
Explore the web with greater privacy
Get ExpressVPNSign up today for a chance to win FIFA World Cup 2026™ tickets.